Showing posts with label my_plugins. Show all posts

Plugin: Mover 2


Apr 2014

 * Renamed to MoveIt, and available in t SketchUcation Plugin Store

Aug 16, 2009
* Released update fixing possible bugsplat.
* Added support for Organizer.


Mover2 can be installed along side of the current Mover plugin. You can install Mover2, and still keep and use Mover.

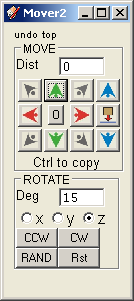
I've made a few changes to the dialog as you can see to the left, plus I've added a couple new operations.

Compatibility

I developed this plugin using SketchUp free on a PC. I do not have a way of supporting Mac users at this time.

Moving and Copying

The arrow buttons move the selected Group or Component in the direction of the arrow. Up and right are the positive directions, while down and left are negative.

Hold the Ctrl key to leave a copy when moving. Moving works with a single selected entity.

The "0" button moves the entity to the ORIGIN.

Key Shortcuts are supported for moving. Select the entity, move the mouse over the Mover dialog to give it focus, and use the arrow keys to move. PageUp/PageDown move the entity Up and Down (Z axis)

Sliding

Hold the Shift key while clicking a (red or green) button to slide the entity against a wall, if one is found. Sliding works along the X (Red) or Y (Green) axes, but not the Z (blue.) Good for moving furniture against a wall.

Dropping

The Drop button drops items onto the XY plane. If the entity is already below, it is moved up. Hold the Ctrl key to drop entities onto a surface (good for dropping trees onto a terrain.) Dropping works with multiple entities.

Rotating

Enter an angle for the rotation and select an axis of rotation.

CCW rotates the selected entity Counter Clock Wise around the selected axis.
CW rotates the selected entity Clock Wise around the selected axis.

RAND rotates the selected entity a random amount limited by the amount in the text box, so using the image, pressing RAND will rotate the selected entity anywhere between -15 and +15 degrees around the Z axis.

Rst will Reset the entity's rotation and align it to the global axes.

Installation
  • Download mover2.zip.
  • Extract the files and place them into your SketchUp/Plugins folder.
  • Restart SketchUp.

Feedback

Feedback is appreciated. Thank you for your interest.

Bugs
  • I've noticed the Shift key "sticks" on when it is not pressed. To fix, move the mouse over the dialog, and toggle the Shift key a few times.

Plugin: Add Hidden Layer

Update Apr 2014 - Version 1.0.1


Add a Layer to your SketchUp model and control its visibility on existing and new Scenes.

Use

Activate Add Layer from the Plugins menu.

Install

Add Layer is available on the SketchUcation Plugin Store.

or install manually:

jf_add_layer-1.0.1.rbz

Plugin: Selection Memory


Selection Memory is a Toolbar analogous to the Memory buttons on a calculator. The 4 buttons allow you to Store (MS) the current selection, Recall (MR) the stored selection, Add (M+) the current selection to memory, and Subtract (M-) the current selection from memory.

You can turn on and off the Toolbar from the View > Toolbars menu.

The plugin will not allow entities that are inside a Group or Component to be added to the selection memory. This is due to a bug in SketchUp.

selection_memory.rbz

(Updated 2013-02)

Plugin: The Homer Button

This plugin does... well it doesn't really do anything useful! It puts a little Homer on your Toolbar and plays a sound file. Just a fun little thing for when you have a Homer moment.

Download homer.rbz

(Jan 2013 - Link Updated.)

Plugin: Ruby Toolbar

This Windows-only plugin creates a Toolbar for controlling the Ruby Console

It can open and close the Ruby console, clear the console, load a ruby script, reload the last script, and browse the Plugins folder.

Updated Jan 11, 2011
  • Remembers most recently used folder and file between SketchUp sessions.
If anyone is feeling generous, I could really use a set of nice-looking button images in a consistent theme. I threw the current images together from free images I found online.


----

Update Jan 5, 2011
  • Changed Toolbar name from "Ruby Console" to "Ruby Toolbar"  ( TT )
  • Wrapped in additional module namespace RubyToolbar
  • Made to use SketchUp's Extensions Dialog
  • Use $suString.GetString to get proper "Ruby Console" name string.
  • Better check if TB was previously visible.
  • Use UI.start_timer to restore Toolbar.
 ----


Installation
  • Download rubytoolbar.zip
  • un-zip the archive to your Sketchup/Plugins folder, and re-start SketchUp. The extracted files should be located as in the following image:


Installation files relative to the Plugins folder:


Plugin: Jitter

Update Jan 3, 2011 Minor Update; Thanks to ThomThom
  • Internal changes which should speed it up a bit.
  • Works on geometry selected within a Group or Component.

Jitter randomly moves the vertices of the selection. Jitter operates on vertices, but you can select any combination of faces and edges.

Menu: Plugins/Jitter

Use: Select a collection of Faces and Edges, select Jitter from the menu. Large selection may take a long time.


Download

jitter.rb <- Right-click this link and save the file to your computer. Move the file to your Plugins folder, then restart SketchUp.

Plugin: Follow This

About

This plugin allows you to use a path  inside a Group  for a Follow Me operation on a Face outside the Group.

This plugin is at the stage where it works in simple situations, but may not be reliable or stable. Use with caution.

History


Update 2010-Dec (small change)

  • Valid Faces are highlighted as the mouse is moved  over them.
  • Changed filename (see note at end of post.)

Use

  • Open a Group for editing, and right-click a Face.
  • Select Follow This from the context menu.
  • The Group will close. 
  • Move the mouse over a Face you want to extrude, then select it using the right mouse button.


To install, right-click the link below and select "Save As" to save the file to your computer. Move the file into your SketchUp Plugins folder, and restart Sketchup


  • Download plugin: jf_follow_this.rb <-- Right-click, and select "Save Link As" or "Save Target As"
  • Once saved, move or copy the file to your SketchUp Plugins folder.
  • The "Follow This" item will appear when right-clicking a Face.
  • Note: This file should replace any file named follow_this1.rb (if installed.)


Sphere Tool

Update 2010 Dec, 13 (Internal version 1.4)
  • Menu: Draw/SphereTool
  • Code cleanup, and generally tried to make it behave like a native SU Tool.
  • Press the Tab key to switch between draw by radius and draw by diameter.
  • Fixed clipping on tool startup.
  • Added line thickness when inference locked.
  • Made VCB and Statusbar texts consistent, accurate.
Due to inconsistent file names for past versions, this file (jf_spheretool.rb) is meant to replace any of the following files in the Plugins folder:
  • spheretool.rb
  • spheretool1.1.rb
  • spheretool1.3.rb
  • jf_spheretool.rb
  • (You get the idea.)
---
Download jf_spheretool.rb


Here's a quick tool for drawing spheres. It creates a Sphere option under the Draw menu.

Download the script and move it into your Plugins directory.

A group is created to hold the sphere. You can enter the number of segments you would like to use. It defaults to 24. Even-numbered segments work best, odd one cause unpredictable results.

Spheres are drawn with the poles along the Z axis.

SketchUp Graphing Plugin

Update: 2010 December 05, a cold and snowy Sunday morning.
  • Add function to Layer (allows Color By Layer)
  • Add Function to Group
  • Users can enter X range and X step values

Equation Grapher is a free plugin for Google SketchUp.

Activate the plugin in the menu: Plugins/JF Graph Eq

A dialog will ask for the X Range and X step value to plot the function through.

The Function dialog will prompt you to enter the function to graph. The function must be valid Ruby language statement. (see also: Ruby Math module.) Use paranthesis to force order of operations, or whenever there is doubt in the order in which operations might occur.

Colors

To display the plots in color, open the Layers dialog and select Color By Layer in the fly-out menu. Then, select Edge color by material in the Styles/Edge Settings dialog.

Installation

Download the file attachment below. Move the file to your SketchUp Plugin folder, and restart SketchUp. The file is meant to replace the file named eq_grapher.rb (if you have it also.)

Download: jf_eq_grapher.rb.


Construction Line Tool Update (version 1.2)

I made a few minor changes to my Construction Line Tool.

  • Cursor updates immediately after key press to indicate current line type. (Thanks to Thomas Thomassen.)
  • Use the current stipple when rubber-banding.
  • Made the default stipple to be the first in the selection list.
  • Updated the infinite cursor to be less heavy in appearance.
  • Increase line width when inference is locked.


Download Version 1.2

There are 2 downloads available. The Windows installer can be used in any situation and will replace any currently installed version. The downside is it is a larger download. It also allows for uninstalling from the Windows Start/Programs menu, or Control Panel.

The .zip file must be installed/removed manually - just extract and over-write the existing Construction Line Tool files in the Plugins folder.

Construction Line Tool Update version 1.0

I quietly updated my Construction Line Tool a few weeks ago. No complaints so far, so here is the official release.

Changes include:

* Version 1.0
* Added infinite Construction Line creation. Hit Ctrl again to cycle.
* Added selecting the 4 Construction lines types available in SU.
* Fixed clipping on start-up.
* Created a Windows Installer.
* changed the name of the Toolbar to JF Tools. (This may un-settle your Toolbar positions.)

See Construction Line Tool Post Page

Download Page

Plugin: Lay Off

Lay Off is a SketchUp plugin that changes the visibility behavior of new Layers.

When enabled, added Layers are visible only in the current Scene only, and hidden in all other Scenes (current and future.) When disabled, you get the "normal" SketchUp behavior you are used to.

Lay Off appears in the Plugins menu, and also has a toolbar button. Toggle the button on/off anytime while modeling. Models that are saved with Lay Off enabled, will re-open with it enabled; however, Lay Off is always OFF when starting a new model.

Adding Layers when there are no Scenes in the model will result in none of the added Layers visible in any Scene added afterwards.

LayOff is $9.00 and is available through smustard.com

LDraw .dat Importer for SketchUp

My simple .dat importer for Sketchup is now avalable on bitbucket.

It is very "prototype", but is still useful if you want to get difficult LDraw (Lego) parts into SketchUp.

This plugin could do a lot more, but I don't find a lot of time to work on it; which is why I create the bitbucket repo.

Lego (LDraw) Build Instructions in SketchUp

I've been playing around with Legos in SketchUp (again). I've added some cool features to the importer - like creating build steps on import, and color coding each step. Each step also gets its own Layer, so you can toggle them on/off as you like. I hope soon it will be possible to create high-quality build instructions right from SketchUp.


The exporter works alright the way it is, but I'm working on incorporating the same build-step system into that. The user would need to create a Layer for each Step in the build.

Once that is done, you should be able to use SketchUp for the entire lego design and build process. The exporter is LDraw compatable, so you can load the output into any other LDraw software you use.

I have some ideas about lego-specific tools for placing and rotating parts, but we'll see how that goes...

The updates are not ready yet, but hopefully soon (a week?)

Updated "Protrude" Plugin

Changes include:
  • Compatible with SU6 and SU7.
  • Takes advantage of performance enhancements in SU7.
  • Fixed bug for handling of comma as decimal point on German systems. (Thanks Stefan!)
  • Removed dubugging output in the Ruby Console.
  •  Uses current model's Units settings, including Precision setting.
  • Fixed bug where inputs could be selected but not edited. Yikes.
  • Can set "Reasonable" Offset and Height independently by clicking the labels "Offset" and "Height".
  • Added tooltip to "Offset" and "Height" labels.
To install, download the .zip file from the page below, and move the files into your plugins folder - over-writing the protrude.rb file and protrude folder (if it already exists.)

 See the Protrude page for download.

Plugin: Grey Scale

This requested plugin switches the in-model material colors to grey scale, and back again. The grey color is calculated as an average of the RGB values.

The model can be saved in Grey mode, and the original colors will be preserved upon opening the model again. Color changes made in Grey mode will not be kept.

While in Grey mode, right-clicking a face will revert the face's material back to its original color.

Download here.

Updated Construction Line Tool

  1. Hitting the Ctrl key will toggle the creation of Construction Points at the line's end points.
  2. Added ability to change length of the last drawn CLine using VCB.
Visit the CLineTool page for the latest download.

Construction Line Tool Update

The tool now adds Construction points to the ends of the line for snapping.

See the Construction Line Tool page for information and downloads.

SketchUp Custom Toolbars

2010-09

* Updated for small bug in placement in SketchUp 8.


toolbars-2010-09.zip


This is an update to Custom Toolbars plugin with the missing icons replaced. I must thank Nathan Cheever for his hard work on these icons.

This Plugin allows you to build your own customized Toolbars. Creating a Toolbar is easy; Custom Toolbars creates a "Toolbars" folder in your SketchUp Plugins folder. Create a .txt file in this Toolbars folder and give it the same name as you want the name of the Toolbar. Then, edit the .txt file and simply list the name of the tool you would like to appear in the Toolbar.

See the examples .txt file in the Toolbars folder.

This plugins needs to be enabled from the Preferences > Extensions Dialog. Toolbars are available in the View > Toolbars menu.

Example Toolbars

There 3 example toolbars available when you install the plugin:


The following image shows the buttons available for use in your own toolbars.

Plugin: Custom Toolbars Beta 1

This is a beta release. This means it may not be stable and could cause problems. As always, do test this on an unimportant model first.

Download and extract the files keeping the folder structure.

In Plugins/Toolbars see the Commands.html file for a list of supported commands (image).

Some of the icons are not ready yet, and will display a "no icon" icon. A special thanks goes out to Nathan Cheever for his fantastic icons, thanks Nathan!

Toolbar files are simple text files with a list of commands and separators. See one of the included toolbar .txt files as an example.

To enable the toolbars, go to the Extensions tab in the Window > Preferences menu; select Custom Toolbars. The toolbars will appear in the View > Toolbars menu.

Download toolbars_beta01.zip

Popular Posts (Last 30 Days)