A youtube user has posted 4 videos showing a new plugin for sketchup. The waybe plugin automatically unfolds a shape onto a flat surface. It seems to be geared for making paper models as it adds glue tabs as it unfolds.
There's no information on where to get the plugin.
Chris Picciano: Free 3d Models
Chris is a professional architectural drafter and designer working with AutoCAD.
Since 2006, he has added SketchUp to his skills, and is offering several collections of outstanding 3d models for free.
Since 2006, he has added SketchUp to his skills, and is offering several collections of outstanding 3d models for free.
New Workflow Video by Justin Chin
Working in both Maya and SketchUp, Justin says he can do character rigging in SketchUp just as fast as in Maya; and goes on to say after all else, SketchUp is the way to go.
Visit Justin's blog and watch the time-lapse video.
Visit Justin's blog and watch the time-lapse video.
SketchUp Plugins Menu Rant
I posted what amounts to a rant with the purpose of getting people motivated to solving a primary disfunction of SketchUp: that the Plugin menu is not customizable. Users should be able to organize the menu however they see fit. Plugins should not be deciding where to fit in the hierarchy, but should rather be requesting permission to a central menu authority - such as a menu registry module.
Google Chart API
Google has opened an API for creating charts using a URL. It easy to use and makes nice looking charts.
Here's an example:

or maybe it should be...

http://code.google.com/apis/chart/
Here's an example:
or maybe it should be...
http://code.google.com/apis/chart/
Google Code and SketchUp API Blog
It looks like Google has been hard at work creating and updating SketchUp's Ruby API documentation and examples, and have opened a couple new resources:
Google SketchUp Ruby API
Google SketchUp API Blog
Google SketchUp Ruby API
Google SketchUp API Blog
Sketchucation Forum Move
If you haven't heard, the SCF have been moved (announcement) to a new address.
Please register at the new board using the same username and email address. New posts and replys have been disabled at the old board.
Please register at the new board using the same username and email address. New posts and replys have been disabled at the old board.
Plugin: Export Outliner
I wrote this for a specific type of output; something called CI ID (or something.) This plugin exports the outliner to a text file.
Download the script.
The Outliner:
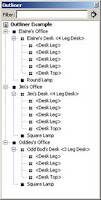
The User interface
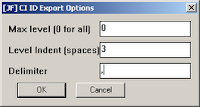
The Output.

Download the script.
The Outliner:

The User interface

The Output.

Plugin: Protrude
This is the first step in a greeble plugin. And by first step I mean there are possible bugs.
Protrude performs 4 basic operations: dividing, offsetting, protruding, and tapering.
- Select the face(s) you would like to protrude.
- Divide them, if applicable. Only rectangles are able to be divided. Division occurs parallel to short side.
- Use the Set reasonable values to set the offset, protrude and taper values to something reasonable.
- Press Protrude to see the reults.
- Edit values, and hit Do Over to re-do the most recent operations.
- If the right-side input columns are used, a random number is generated for the operation. This number is in the range of left-column to right-column. Leave them blank if you don't want a range. (Sorry, it's the law. Just kidding, just a
bugfuture enhancement opportunity.)
You should completely delete both the protrude folder and protrude.rb file from your Plugins folder before installing this version.
Download jf-protrude_2015-12-06.rbz *
Updated Unfold Plugin
After a report of bad behavior, I've updated the unfold plugin. I have not changed the way it works, so no one should notice the changes.
You should, however notice the new support for undo - when you hit Undo, the selection set will be updated to reflect the undo operation. However, it sometimes gets confused.
Let me know how it goes.
You should, however notice the new support for undo - when you hit Undo, the selection set will be updated to reflect the undo operation. However, it sometimes gets confused.
Let me know how it goes.
Sherwin-Williams Palettes
This is a materials library created from these S-W models found in the 3DW.
Installation
1. Download.
2. Unzip the sw.zip file.
3. Move the Sherwin-Williams folder to your SketchUp/Materials folder.
Installation
1. Download.
2. Unzip the sw.zip file.
3. Move the Sherwin-Williams folder to your SketchUp/Materials folder.
Plugin: ldraw.rb
The ldraw.rb can import ldraw.org .dat files.
The ldraw format does not lend itself well to SketchUp. In a nutshell, ldraw was developed at a time when parts were created in a text editor by hand. So to make that easier, dozens (if not hundreds) of primitives were created upon which parts were built. So when you load an ldraw part into SketchUp, the parts are pretty heavy with nested components and duplicate edges. I might add an option to "explode primitives." That would create a single component per part, and take care of duplicate edges.
Another major problem is face orientation. Faces are drawn arbitrarily facing in or out.
Yet, if you need a complex part that already exists in ldraw, this plugin can be a time saver.
Download ldraw.rb
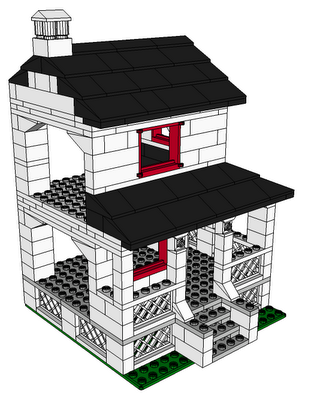
House With Porch by Jeff Stebel
The ldraw format does not lend itself well to SketchUp. In a nutshell, ldraw was developed at a time when parts were created in a text editor by hand. So to make that easier, dozens (if not hundreds) of primitives were created upon which parts were built. So when you load an ldraw part into SketchUp, the parts are pretty heavy with nested components and duplicate edges. I might add an option to "explode primitives." That would create a single component per part, and take care of duplicate edges.
Another major problem is face orientation. Faces are drawn arbitrarily facing in or out.
Yet, if you need a complex part that already exists in ldraw, this plugin can be a time saver.
Download ldraw.rb

House With Porch by Jeff Stebel
Sidetracked: formToArray.js
I was going to work on greeble.rb today, but I got sidetracked - sidetracked in a good way, though.
The options for a decent greeble plugin could be quite long. I started thinking about how to get all the options from a WebDialog to the plugin. I ended up coding up a way to pass an entire HTML form to a script, and create an options hash from the string.
There's 2 parts; the javascript method, and the ruby method. The javascript loops through the html form, building an array of strings in the form "key=value". The array is joined, and passed to SU-Ruby using the window.location= method. The ruby part parses the string and builds a hash from it. It sounds simple in retrospect, but it was a learning experience for me.
I'll post it when I have time to test it in use.
Plugin: WebConsole
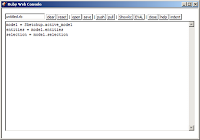
2010-05-22
* Eliminated the Results textarea in favor of SketchUp's Ruby Console.
* Automatic resize of the code textarea.
* Changed button elements in favor of button-like span elements.
* Added ShowRC button to show the Ruby Console.
* Added hidden Help div
* Added code indenting using rbeautifyer.rb (http://www.arachnoid.com/ruby/rubyBeautifier.html)
* Code indentation is maintaned when snippets are saved and loaded.
* RubyRC clears the Ruby Console if rubyCons.exe is installed (http://sites.google.com/site/morisdov/)
* Push code to model - saves the code as a model attrobute.
(easilyshare code along with a model)
* Pull code from model - pulls code from moel attribute if it exists.
About
WebConsole is a WebDialog to test code snippets in. Enter your code in the console window, then press Exec. Load and Save buttons are provided for persistent storage of your snippets.
Installation
- Download webconsole.zip.
- Unzip the files and move them to your SketchUp/Plugins folder.
If you already have a favorite editor, you're best bet is to set it up to use the Sketchup Bridge plugin.
libsk.rb
I'm going to (have) start putting together a library of (hopefully) useful Ruby/SketchUp helper methods. Maybe called sk.rb, or libsk.rb.
I want to organize it in a way so that a user can require the entire lib, a subset of it, or an individual part of it. I think it can be organized into folders and sub-folders. For example, take Group.moveto() . Here is an example folder layout and usage:
And here is the example usage:
Thoughts?
I want to organize it in a way so that a user can require the entire lib, a subset of it, or an individual part of it. I think it can be organized into folders and sub-folders. For example, take Group.moveto() . Here is an example folder layout and usage:
*/Plugins/
   sk.rb
   sk/
       groups.rb
       groups/
           moveto.rb
And here is the example usage:
You can download an example help file.
# require everything.
require "sk.rb"

# include everything in the groups folder only.
require "sk/groups.rb"

# include only the moveto method in the groups folder.
require "sk/groups/moveto.rb"
Thoughts?
Plugin: Randomize TIN
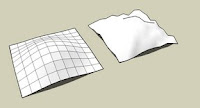
This plugn adds some (user specified) randomness to a Sandbox-created TIN. It adds a Randomize TIN option under the Plugins menu.
Installation
The input can be any valid SketchUp length, i.e. 1", 35.54, 4m. A pop-up will tell you if the value is not valid. The TIN is looped over and each point is moved up or down by an amount in the range of -amt to amt, where amt is the user entered value.

Installation
- Download random_tin.rb.
- Move the file into your SketchUp/Plugins folder, restart SketchUp.
The input can be any valid SketchUp length, i.e. 1", 35.54, 4m. A pop-up will tell you if the value is not valid. The TIN is looped over and each point is moved up or down by an amount in the range of -amt to amt, where amt is the user entered value.
Plugin: Unfold Tool
This SketchUp script assists the user in flattening, or unfolding, 3d objects onto a 2d plane.
Installation
Usage
Installation
- Download unfoldtool.zip.
- Move the file into your SketchUp/Plugins folder.
- Restart SketchUp.
Usage
- Select the Unfold Tool from the Plugins menu, start selecting faces to unfold. The selected face is unfolded to match next selection.
- Hold the Control key to reverse operation - rotate the subsequent face to match the already selected face(s).
- Alt-click on a face to select all the faces in the same plane.
- Shift-click to toggle selection of faces.
- Click off the model to reset the selection.
See Also
My unfold tool is pretty basic - you may want to check out the Flattery plugin as an alternative.
Plugin: Print Shortcuts
This plugin creates an HTML file of your shortcuts in your browser. You can select 1 or more columns, but I find 1, 2, or 3 work the best. Look for Print Shortcuts under the Plugins menu.
Download printkeys.rb

Download printkeys.rb

Plugin: Template Utilities
This script adds 2 menu items to the File menu: Save as Template, and New from Template. It allows the user to quickly create and use templates.
Instructions
- Save as Template saves the current model as a template in the templates folder.
- New from Template lets you choose a template, and starts a new model using the template. The selected template becomes the default template.
Instructions
- Download template_utils.rb
- Move the file into your Sketchup.Plugins folder, and restart SketchUp
Plugin: Zoom Selection
Adds 2 menu items to the Camera Menu: Zoom Selection, and Zoom Out.
I have set up 2 key shorcuts: 'z' for Zoom Selection, and 'Shift-Z' for Zoom Out.
Developers
Script writers can call these methods using the following syntax:
- Zoom Selection zooms to the selected entities. If nothing is selected, zoom to the model extents.
- Zoom Out zooms out by a factor of 2.
I have set up 2 key shorcuts: 'z' for Zoom Selection, and 'Shift-Z' for Zoom Out.
Developers
Script writers can call these methods using the following syntax:
require "zoom_selection.rb"
JF::zoomSelection
JF::ZoomOut(factor)
Plugin: Point at Intersection
Select 2 lines, then right-click and select Point at Intersection. Adds a Guide Point at the intersection of the lines.
Instructions
1. Download point_at_intersection.rb
2. Move the file to your Sketchup/Plugins folder
3 Restart SketchUp
Instructions
1. Download point_at_intersection.rb
2. Move the file to your Sketchup/Plugins folder
3 Restart SketchUp
Plugin: 3D Warehouse Quick Search
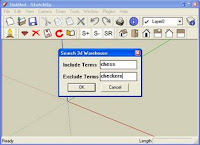
Allows the user to enter search terms, and opens a web browser to the search results from within SketchUp.
Instructions
- Download 3dw_search.rb
- Move the file into your Sketchup/Plugins folder.
- Restart SketchUp.
- A new item named Search 3DW appears under the Help Menu.
- Assign a shortcut key for fast access.
Plugin: Arc Centerpoint
Right-click an arc (or circle) to insert a Guide Point at the arc's center.
Installation
Installation
- Download: arc_centerpoint.rb
- Move the file into your Sketchup/Plugins directory, then restart SketchUp
- Right-click an arc and select Arc Centerpoint. Click on the edge, not the face.
Mover Pugin Updates
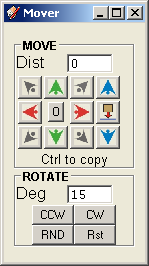 I have been making progress on mover.rb. You can see the latest interface at the left.
Notice I have removed the Copy checkbox - copying is now done by holding the Ctrl key while pressing a direction. All directions have keyboard shortcuts also (arrow keys.) You can use the Ctrl key along withe the arrow keys to move and copy an entity very quickly.
The Drop button drops selected entities to the XY plane. However, if you hold the Ctrl key, entities get dropped onto any surface below. Good for dropping trees onto a hillside, for example. Credit for the idea goes to Octavian 'TBD' Chis's Drop.rb. Dropping and rotating operate on multiple entities.
I replaced the fixed rotate amounts with a text entry box. Rotating still occurs around the Z axis but you can rotate clock-wise, or counter clock-wise. RND will rotate some random amount between 0 and 360. Rst rotates it back to normal (world axes.) I'd like some good icons, too.
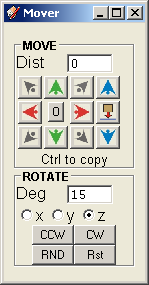
I'm still considering other ideas from user's feedback such as:
- being able to select an axis to rotate around. This is likely to happen, see right.
- if the selection contains a single construction line, use the line as the axis of rotation.
- use the Ctrl key to be able to slide a selection up against a wall, similar to dropping onto a surface, only horizontally.
- add a repeat amount (for multiple copies.)
- copy in 3 dimension at once. (array copy)
- align camera so view matches mover layout (for when left is right and right is left)
Thanks again for visiting my blog and using mover.rb. Comments are always appreciated.
Slow Time for Scripts
Summer is typically a busy time at work (I work as a maintenance tech), and at home. I haven't spent much time writing or updating scripts for the past month, and it doesn't look good for the next month.
When I do get time, I want to get the mover plugin fixed up. There's several internal improvements that need to be made to make it easier to maintain. Plus several new features are on the table - like adding support for dropping Groups onto a sandbox terrain.
When I do get time, I want to get the mover plugin fixed up. There's several internal improvements that need to be made to make it easier to maintain. Plus several new features are on the table - like adding support for dropping Groups onto a sandbox terrain.
Get Center Point from of an Exploded Arc
Working on a plugin to get the center point of an exploded Arc.
New 3D Warehouse Sort Options
Google has added 3 new ways to view search results on the 3D Warehouse; you can now sort your search results by date, rating, or popularity. I've commented on each of the options below.
Date - Sorts models by posted date, most recent uploads first. Works as expected.
Rating - This is a little confusing. One would think sorting by rating would produce a list with the highest-rated models first. Unfortunately, this is not how it works. Sorting by rating appears to sort models into 2 categories: models that have been rated, and models that have not been rated. I'm not sure I see the value.
Popularity - I'm not sure what order the models appear when sorting by popularity. It is somehow related to a models ratings, plus some other unknown factors; possibly number of downloads and/or number of stars. I also suspect it is tied to Google Earth, since many of the most popular models were designed for downloading into Google Earth (basic shapes with texture images.) Since no one knows what it really means (outside of Google,) it is also of limited value for users.
Much more useful are some advanced search options, which will be the subject of a future post.
Door/Window Animator Plugin
I was sort of surprised when it hadn't been done yet, and even more surprised it apparently hasn't even been requested yet. I'm talking about a door/window animator plugin to open/close doors and windows.
Right-click a Door to Open/Close it. Open/close all doors globally. Configure angle of open-ness.
The real work would be to create/convert door components into something the plugin could recognize. Attributes would need to be defined such as; axis of rotation and weather a door opens in or out.
Not terribly hard to implement, overall.
Sunrooms
I recently did some work for Four Seasons Sunrooms. I did some cleanup and optimization of several sunroom models. They have posted the models to Google's 3D Warehouse.

SketchyPhysics Beta Tester
I've been invited to help beta test Chris Phillips' SketchyPhysics. SP is a SketchUp plugin that uses the Newton Engine to simulate real-world physical interactions on Groups. I'll post some videos as soon as I get permission.
Update: Chris has posted a video here.
Update: Chris has posted a video here.
Style Thumbnailer (Batch Style Exporter)
I should have this ready on Thursday (5/23) Sorry for the delay.
It exports the current Scene once for each In Model Style. No other options at this time.
I want to get it out, get some feedback, and debug the basic functionality before adding features.
It uses the Save dialog to select a directory as a directory browser work-around. It's a little clumsy, but it works. The image filenames are constructed using [model_name]-[scene_name]-[style_name].jpg. The export from the image below would create the 5 files shown in the 2nd image.


Download .zip archive. There are a few slight changes compared to the images.
It exports the current Scene once for each In Model Style. No other options at this time.
I want to get it out, get some feedback, and debug the basic functionality before adding features.
It uses the Save dialog to select a directory as a directory browser work-around. It's a little clumsy, but it works. The image filenames are constructed using [model_name]-[scene_name]-[style_name].jpg. The export from the image below would create the 5 files shown in the 2nd image.


Download .zip archive. There are a few slight changes compared to the images.
Debugging WebDialogs
This little piece of code let's you see the source of a WebDialog, but includes any dynamically (javascript) created content. Normally, using View Source on a Dialog only shows you the original html file you defined. Very useful for WebDialog debugging.
http://billfriedrich.tripod.com/index.html?Web
http://billfriedrich.tripod.com/index.html?Web
Using Ruby Libraries from SketchUp
I found this short plugin - it's an RSS reader plugin for SketchUp. Why, you ask? I have no idea, but the author uses some interesting techniques worth noting.
This line appends the ruby library path to SketchUp Ruby's global $LOAD_PATH variable. Now, SU will look in the appended folder for required files; as demonstrated by the next 2 lines:
...
The other interesting thing the author does is use open-uri to open and read a document from the Internet into a string:
This code calls the external ruby to do the work. The -r option is equivalent to "require 'open-uri'". The -e means execute the following stuff. So, SketchUp's built-in Ruby is executing the external ruby, which prints the web page to standard out. The ` (backtick?) command in Ruby captures the output, which is then assigned to the "source" variable inside SketchUp. Clever.
Note that instead of the backticks, the author could have used:
which is synonymous with the ` ... ` syntax. I would recommend using this syntax as it will help avoid too-many-quotes syndrome.
Here's another example:
which you can probably guess what it does.
Although this technique does work, I don't think it's an optimal solution. First off, you will need to have the full Ruby installed on your computer, and there's no guarantee that your plugin's users will have it.
$LOAD_PATH << 'C:\ruby\lib\ruby\1.8'
This line appends the ruby library path to SketchUp Ruby's global $LOAD_PATH variable. Now, SU will look in the appended folder for required files; as demonstrated by the next 2 lines:
require 'rss/1.0'
require 'rss/2.0'
...
The other interesting thing the author does is use open-uri to open and read a document from the Internet into a string:
source = `ruby -r 'open-uri' -e 'puts open("#{uri}").read'`
This code calls the external ruby to do the work. The -r option is equivalent to "require 'open-uri'". The -e means execute the following stuff. So, SketchUp's built-in Ruby is executing the external ruby, which prints the web page to standard out. The ` (backtick?) command in Ruby captures the output, which is then assigned to the "source" variable inside SketchUp. Clever.
Note that instead of the backticks, the author could have used:
%x{ ... }
which is synonymous with the ` ... ` syntax. I would recommend using this syntax as it will help avoid too-many-quotes syndrome.
Here's another example:
page=%x{ruby -r 'uri' -r 'net/http' -e 'Net::HTTP.get_print URI.parse("http://www.google.com/")'}
which you can probably guess what it does.
Although this technique does work, I don't think it's an optimal solution. First off, you will need to have the full Ruby installed on your computer, and there's no guarantee that your plugin's users will have it.
SketchUp Ruby Classes Doc Sidebar for Firefox
If you use Firefox, you can specify whether or not a bookmark is to be opened in a sidebar. Simply right click on the bookmark and select Properties from the pop-up menu. Then, enable the "load this book mark in a sidebar" check box, and click OK.
To get the sketchup Ruby API class index into a sidebar, bookmark this link, then enable the sidebar option as described above.
To get the sketchup Ruby API class index into a sidebar, bookmark this link, then enable the sidebar option as described above.
SketchUp Workflow Videos by Justin Chin
Justin Chin (monsterz3r0) has posted some time-lapse videos on Youtube that show how he creates sci-fi models in SketchUp. He's a talented artist and modeller, so check them out. He also has a blog.
SketchUp Mover Script
I posted a script that moves or copies Groups and Components a user-settable distance.
See the Pro Ruby Forum for download and discussion.
See the Pro Ruby Forum for download and discussion.
Reversing Faces
Gully Foyle, over on the Google Help Forum, has posted a great idea to speed up the tedious process of reversing faces.
In the post, it is pointed out that the Push/Pull Tool is unique in that it selects entities when you simply hover the mouse over them. By assigning a shortcut key to Reverse Faces, you can select the Push/Pull Tool, hover over the face you want to reverse, and press the shortcut. Ingenious!
UPDATE: I've since heard from Gully that he was not the thinker-upper of this idea, rather he remembered reading it in the Pro Forum.
Great Image Viewer
I found this great image viewer (freeware) from FastStone. Small, fast, and free - what else do you want? Now go check it out yourself.
Drawing Effeciently With Shortcuts
The idea is to minimize the distance your hands need to travel while selecting the most common tools you use.
Keep your right hand on the mouse. The only exception is entering values in the VCB. (You are right-handed, aren't you?)
Your left hand should be confined to the left-half of the keyboard, pinky on the shift key. I suggest these shortcuts:
You can import these directly into SketchUp by downloading Preferences.dat
Keep your right hand on the mouse. The only exception is entering values in the VCB. (You are right-handed, aren't you?)
Your left hand should be confined to the left-half of the keyboard, pinky on the shift key. I suggest these shortcuts:
- Shift-space => Pencil Tool
- h => Edit/Hide
- Shift-H => Edit/Unhide/All
- g => Make Group
- Shift-G => Make Component
- Shift-C => Toggle Components Window
- Shift-E => Erase Guidelines (construction geometry)
- Shift-A => Protractor Tool (think A for Angle)
- Shift-S => PushPull Tool
- Shift-Z => Zoom Extents (I use zoom_selection.rb, a custom zoom tool.)
- Shift-F => FollowMe Tool
- d => Edit/Delete
- x => Explode
- Alt-1 => ISO View
- Alt-2 => Top View
- Alt-3 => Front View
You can import these directly into SketchUp by downloading Preferences.dat
Zoom Selection
Zoom Selection is a ruby plugin for SketchUp 6 that will perform a Zoom Extents on all the selected entities or, if nothing is selected, perform a Zoom Extents on the entire model. I use the 'z' to zoom to the selection's extents, and Shift-Z to zoom to the model extents.
Download zoom_selection.rb
Installation:
Copy or move the zoom_selection.rb file into the Sketchup Plugins directory. Restart SketchUp.
Download zoom_selection.rb
Installation:
Copy or move the zoom_selection.rb file into the Sketchup Plugins directory. Restart SketchUp.
Subscribe to:
Comments (Atom)
Popular Posts (Last 30 Days)
-
Sketchup materials library of 12x12 vinyl floor tiles. Download download
-
This SketchUp script assists the user in flattening, or unfolding, 3d objects onto a 2d plane. Installation Download unfoldtool.zip . M...
-
Apr 2014 * Renamed to MoveIt , and available in t SketchUcation Plugin Store Aug 16, 2009 * Released update fixing possible bugsplat...
-
2010-09 * Updated for small bug in placement in SketchUp 8. toolbars-2010-09.zip This is an update to Custom Toolbars plugin with t...
-
This is the first step in a greeble plugin. And by first step I mean there are possible bugs. Protrude performs 4 basic operations: div...
-
The Construction Line Tool allows you to draw constructions lines in a similar way as the Pencil Tool. Toolbar: View > Toolbars >...
-
This Windows-only plugin creates a Toolbar for controlling the Ruby Console It can open and close the Ruby console, clear the console, loa...
-
As you probably know, SketchUp 8 Free does not include the ability import/export DXF/DWG files. Although there are some free and commercia...
-
This importer lets you import both ASCII and binary STL files into SketchUp. It automatically detects the type of .stl file and imports acc...
-
Dec 18, 2010 - TIG just released a new .obj exporter. TIG's plugins are usually solid, so I recommend trying TIG's. ( TIG's OBJe...


